Floors are horizontal elements of a building structure that divide the building into different levels for the purpose of creating more accommodation within the restricted space, one above the other, and also provide support for the occupants, furniture, and equipment of a building.
Selection of Floor Finish
In residential or public buildings various types of floors are commonly adopted. The final selection of the floor finish is done only after considering the following points;
- It should be durable.
- It should be easy to clean.
- As far as possible it should be silent or noiseless.
- It should have good appearance.
- It should be free from dampness.
- It should be fire resistant.
- It should have low maintenance cost.
Operations Required Before Taking Up Tiling Work
Before flooring can be taken up following operations should be completed.
- Laying of services like electric cables, pipes, conduits etc.
- Plastering of all inside walls, ceilings, outside walls and fixing door and window frames in place.
- Heavy work in the room in which flooring is to be done.
- Whenever slope in finished floors is desired, points of level & outlets shall be correctly marked & outlet opening made before flooring is taken up.
Tools Used For Floor Finishes
There are different types of tools used for flooring and tiling.
Floats
A float is a tool used for spreading the mortar on the surface of the concrete slab. The size of a float is about 30cm X 10cm and thickness is about 10mm.
Plumb Bob
This tool is used to check the vertically of the surface in the case of fixing tiles on vertical surfaces.
Floating Rule
The floating rule has markings that are used to check the level of mortar.
Tile Cutter
This hand tool is used to cut the tiles manually wherever odd size gaps are required to be fixed.
Cutting Machine
The cutting machine is electrically operated for cutting the tiles.
Chisels and Hammers
These tools are used for cutting and dressing the natural or manufactured tiles which have larger thicknesses.
Wooden Mallet
This tool is used for hammering the tiles in the proper line and level.
Polishing Stones
Polishing stones are used for polishing cement-based tiles or natural stone tiles. They are available in various grades.
Skirting Farma
This tool is used to measure the proper line and level of skirting tile.
Polishing Machine
This is an electrically operated machine used for polishing the cement-based tiles or natural stone tiles fixed on the floor.
Other Tools
In addition to the above, other tools such as Set Square, straight edge, spirit level, drum for wetting the tiles, trowels & threads are used during different stages of tiling.
Bedding
Preparation of Mortar for Bedding
Cement mortar should consist of one part of Portland cement one part of lime six-part of sand or one part of cement and eight parts of sand by volume. All materials should be thoroughly mixed. The quantity of water added should be the minimum necessary to give sufficient workability for spreading and leveling the mortar.
Spreading of Cement Mortar
Before spreading cement mortar, the base should be firm and the surface roughened and cleaned. All scum and plaster droppings or any other loose foreign material should be removed. It should be then wetted properly. The mortar should be evenly spread over the base for two rows of tiles and about three to five meters in length. The thickness of bedding should be between 10mm to 30mm.
Specifications of Mosaic Tiles: (IS 1237-1980)
Dimensions of Tiles
Cement concrete flooring tiles are normally called mosaic tiles and are available in square shape. Their dimensions are
| — | Size (cm) | Thickness (cm) |
| Modular Size | 19.85 x 19.85 29.85 x 29.85 | 20 25 |
| Non Modular Size | 24.85 x 24.85 | 22 |
| Other Sizes | 20 x 20 25 x 25 30 x 30 | 22 to 25 |
All dimensions should be within ± 1 mm for length and breaths and ± 5 mm for thickness.
The minimum thickness of the wearing layer should be as given below.
| Sr. No. | Class of Tile | Minimum Thickness of Wearing Layer (mm) |
| 1 | Plain cement and plain colored tiles for general purpose. | 5 |
| 2 | Plain cement & plain colored tiles for heavy-duty. | 6 |
| 3 | For general purpose terrazzo tiles with chips of size varying from the smallest up to 6mm. | 5 |
| 4 | For general purpose terrazzo tiles with chips of size varying from the smallest up to 12mm. | 5 |
| 5 | For the smallest purpose terrazzo tiles with chips of size varying from the smallest up to 20mm. | 6 |
Various tests for ascertaining the physical properties of tiles
For testing, the procedure is given in IS 1237-1980 of the properties mentioned below.
The flatness of the tile surface
The amount of convexity and concavity should not be more than 1mm.
The tiles perpendicularity
The longest gap between the arm of the “square” & the edge of the tile should not be greater than 2% of the length of the edge.
The tiles straightness
The gap between the thread and the surface of the tile should not be more than 1% of the length of the edge.
The tiles water absorption
The average water absorption shouldn’t exceed 10%.
Wet transverse strength of the tile
The average wet transverse strength should be more than 3 N/mm2.
Resistance to wear of the tiles
The wear should be less than the specified value given below
- For general purpose tiles
Average wears 3.5mm
Wear on individual specimen 4mm
- For heavy duty floor tiles
Average wears 2mm
Wear on individual specimen 2.5mm
Testing and Checking Tiles
Sampling
The consignment of tiles should be divided into a number of lots. Each lot of tiles should be inspected separately to make sure its conformity to the necessity of the specifications.
The tiles which are selected should be of the same type, class, shape, and size and should be selected from a single manufacturer. The inspection and testing of the tiles should be chosen randomly.
Number of Tiles Required for Testing in Different Tests
The number of tiles required for different tests should be selected out of each consignment of 2000 tiles or part thereof.
- For conforming to requirements of shape and diameters, wearing layer and general quality….12 Nos.
- For transverse strength test (wet)….6 Nos.
- For water absorption test….6 Nos.
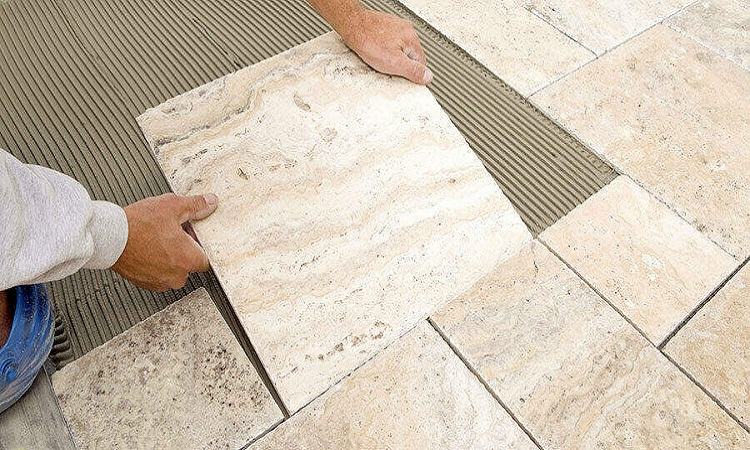
Laying of Tiles
Laying of tiles should commence only after the bedding has become sufficiently hard to offer a rigid cushion for the tile and enable a mason to place a wooden plank for working. Neat cement slurry of good consistency should be spread over the mortar bed over an area enough to accommodate about 20 tiles.
Each tile is laid perfectly on the level and gently tapped with a wooden mallet till it is properly bedded and in level with the adjoining tiles. Joints should be in straight lines and not more than 1.5 mm wide. After one day of laying tiles, the joints should be filled with cement grout of the same color as that of tile.
Fixing of Skirting or Dado Tiles
Floor tiles laid adjoining the wall should project at least 12 mm under the plaster, skirting, or dado. As far as possible half tiles and pieces should be avoided.
After fixing the tiles, the flooring should be kept moist and allowed to be set undisturbed for seven days.
Polishing of Mosaic Tiles and Skirting
Polishing of mosaic tile flooring is done with a polishing machine. There are various types of polishing stones available in the market from 30 to 600 nos.
Polishing of basic coat is done as a lubricant is used between the floor and the polishing stone.
In the second polishing round, grout of cement slurry is used to fill up the joints between the tiles. Thereafter, curing is done at least for 3 days. For 3rd, 4th and 5th rounds of polishing, stones of nos. 120, 220, 320, and 600 are used respectively.
Oxalic acid and white flat brush are used for polishing the 6th round. Thereafter, the floor is washed with water. All doors and windows of the room are kept closed to avoid settling dust on the floor during the last round of polishing.
Advantages of using mosaic tiles for flooring
- Tiles are available in various sizes.
- They can be easily laid on the floor.
- Mosaic tiles are manufactured in the factory. Therefore, they are available readily. Mosaic tiles give uniform design and colour.
- In gray cement mosaic tiles there are limitations in colour and design. However, in white colour, there are number of design options.
- Mosaic tiles are strong and durable.
- There is availability of labour for laying of mosaic flooring tiles.
- These tiles are easy to maintain and economical as compared to other flooring tiles such as Kota, Granite, Terrazzo, etc.
Glazed Tiling
There are various types of tiles, available in the market such as glazed smooth tiles and ceramic matt finished tiles. Generally, glazed tiles are used in kitchen platforms, toilet blocks bathrooms, etc.
Preparation of Surface
Before fixing up the tiles, check the right angles of all corners of the bathroom/W.C., toilet, and kitchen platform. Check the verticality of the plaster.
All the concealed plumbing and electric conduits should be carried out before the execution of the work. All plumbing joints must be checked for leakproofness. Thereafter, a thick coat of bitumen paint is applied and pipes covered with hessian cloth.
Another coat of bitumen paint is applied. Care should be taken that the whole surface of the pipeline and fittings are uniformly and adequately coated. Thereafter, chased areas in walls/floors should be adequately filled with rich mortar and base coat of plaster applied after 3 to 7 days curing over the chased area.
For fixing of tiles cement mortar of 1:1 or 1:2 mix is used (sand should be less than 100 microns). Generally, if such fine sand is not available then only cement paste is used. It is necessary to use the correct proportion of water. Mortar or cement paste should be used for fixing the tiles within half an hour of its preparation.
All types and grades of cement are generally used for fixing the tiles. For ease of working some proportion of neeroo is added. It is observed that due to the use of bad quality neeroo the tiles crack or fall off. It is preferable to utilize cement sand paste than to utilize neat cement paste. This can cause shrinkage problems leading to cracking of tiles and leaching of lime.
It is essential to read the instructions given by the manufacturers of tiles on the tile boxes. We have reproduced general instructions given by one of the tile manufacturers.
- The plastered surface of the wall to be tiled should be with wood float finish and the rendering should be completed at least two weeks before tiling begins.
- The final bedding mix must contain not less than 2 parts of sand passing 100 microns mesh to 1 part of cement by volume.
- Once the mixing has been completed no further water must be added and it must be used within one hour. Too stiff a mix for working must not be used.
- Tiles should be soaked in clean fresh water for 30 minutes before fixing.
- The success of fixing the tiles depends upon the tiler. The tiler must ensure that before he lays each tile it has no film of water on the surface.
- Before fixing the tile, backing mix should be evenly applied and the tile tapped firmly into position to ensure total adhesive contact.
- Backing material between tiles joints should be cleaned before the tile is fixed.
- It is necessary to allow a gap of 1/16 inch or 1.5 mm between two tiles for expansion that may take place in service.
- Before fixing tiles it should be ensured that the tiles purchased are of acceptable shade or colour. Normally companies do not take responsibility for colourvariation, once the tiles have been laid.
Procedure for Fixing Tiles
Check the corners of the plaster with a set square. They should be perpendicular. Put corner leveling markers on the top of the wall and with string introduce a few more markers. The tile should be uniformly covered with cement or cement mortar paste. The tile should be squeezed properly on the plastered base & then fixed into position by tapping the tile into the correct position.
After fixing the tile, fill the joints with cement paste. Press the paste with a finger, so that cement paste is squeezed within the joints appropriately. A hollow sound is the indication of the void because of bad workmanship. It is essential to match the vertical & horizontal lines of the tiles.
The joints between two tiles should be kept minimum. Remove all excess cement from joints. Clean all joints and refill these joints with white or colored cement neatly. Curing should be done a minimum of 6 times a day for 15 days.
Reasons for Cracks in Tiles
Cracks are often observed on tiles and they can occur due to several reasons.
- Uneven/unequal settlement of the wall backing the tiled work.
- Rusting of concealed pipelines or rusting of reinforcement causes spalling of concrete or masonry leading to cracks in concrete or masonry base as well as on the tiled work over it.
- Expansive chemical reaction because of use of poor quality neeroo or any other material mixed with cement can cause tiles to crack.
- Excessive thickness of paste used to fix the tile often shrinks and cracks the tile.
- Uneven application of adhesive paste leaving voids. If impact or load is given on this hollow area it will cause the tile to crack.
- Poor or cheaper quality of tiles can also crack easily.
All types/grades of cement can be used in tiling. Generally, tiles of good quality can be fixed with any type or grade of cement and cracks do not occur due to the use of any specific grade or type of cement.
Conclusion
Tiling work is absolutely necessary for areas that are in contact with running water or dampness.
Tiles are used where there is a need to have cleanliness and hygiene. It is easier to keep the tiled area clean & dry. Properly fixed tiles look attractive and pleasing to the eye. However, like all activities of construction, these activities also require a proper selection of materials and correct practice to give a satisfactory and trouble-free performance.