Plaster is a smooth paste made of sand, lime & water which goes hard when it dries. Plaster is utilized to cover walls & ceilings and is also utilized to make sculptures.
Plastering is the process of applying a thin cover of cement mortar over the exposed surface to safeguard the wall against penetration of rainwater and other atmospheric agencies. It improves the appearance of the structure and gives a decorative effect to the interiors.
Plastering is a technique that is utilized to enhance the durability of the wall. The main objective of plastering is to decorate the elements of the walls. Plastering of external walls refers to the process of covering uneven surfaces and rough walls with the help of a plastic material named plaster.

History of Plastering
A form of plastering was used by primitive civilizations, creating durable and weather-resistant structures using mud. The Egyptian pyramids consist of plasterwork comparable to that utilized today that remains hard & durable some 4,000 years later.
Greek artisans utilized plaster, primarily to cover the exterior of the temples but sometimes also interiors. Throughout history, plaster ceilings became increasingly ornamental, with those during the Tudor period being particularly extravagant.
However, the use of plaster as a means of demonstrating artistic skill and expression had waned by the 19th century, when imitation and mechanical reproduction displaced it as a creative medium. However, plaster is still very commonly used as a surface finish for interior walls, and ceilings, and still sometimes for exterior walls.
Why is Plastering Done?
- To prevent water ingress into brickwork/blockwork, both bricks and blocks absorb water from outside. This is the main reason why all the stone works are left unplastered.
- In the case of the surface of walls – resolve the issues in underlying brickwork/blockwork – like plumb-outs, diagonal-outs, etc.
- In the case of ceilings – make up the undulations caused while casting concrete. The same applies to plastering over RCC walls also.
- To prepare a proper base for further painting works (Putty application, paint application, wallpaper application, etc.)
The Procedure of Plastering Work
For good plaster, the plaster must have a proper bond with the surface of the masonry to be plastered. For this, the surface should be prepared by adopting the following steps.
1. Preparation of Surface for Plastering
- Keep all the mortar joints of the wall rough, to give a good bonding to hold the plaster.
- Roughen the entire surface of the wall to be plastered.
- Clean all the joints and surfaces of the wall with a wire brush, there should be no oil or grease, etc. left on the wall surface.
- If there exist any cavities or holes on the surface, then fill it in advance with the appropriate material.
- If the surface of the wall is smooth or the wall to be plastered is an old one, then remove the mortar joint up to a depth of at least 12 mm to give a better bonding to the plaster surface.
- Wash the mortar joints & whole wall to be plastered, and keep it moist for at least 6 hours before applying a coat of cement plaster.
- If the projection on the wall surface is more than 12 mm, then knock it off, to obtain a uniform surface of the wall. This will minimize the consumption of plaster.
2. Groundwork for Plaster
- To get the uniform thickness of plastering throughout the wall surface, first, fix the dots on the wall. A dot means a patch of plaster of size 15 mm x 15 mm and having a thickness of about 10 mm.
- Dots are fixed on the wall first horizontally and then vertically at about 2 meters covering the entire wall surface.
- Check the verticality of dots, one over the other, utilizing plumb-bob.
- After fixing the dots, the vertical strips of plaster, known as screeds, are formed in between the dots. These screeds serve as the gauges for maintaining an even thickness of plastering being applied.
3. Applying Under Coat or Base Coat
- In the case of brick masonry, the thickness of the first coat of plaster is in general 12 mm & in the case of concrete masonry, this thickness varies from 9 mm to 15 mm.
- The ratio of cement and sand for the first coat of plaster varies from 1:3 to 1:6.
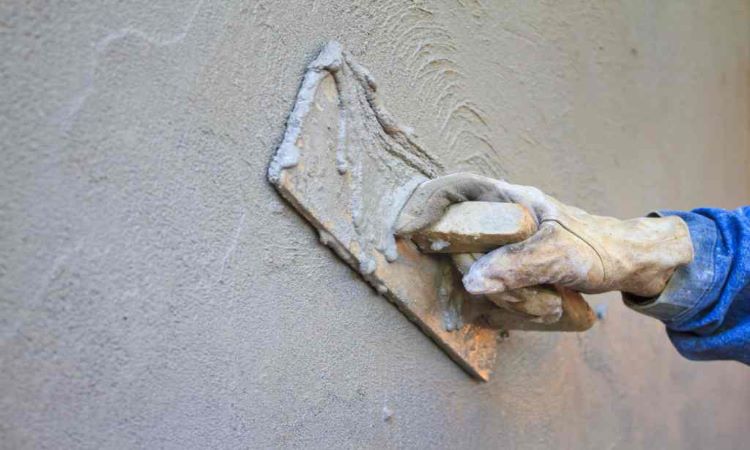
- Apply the 1st coat of cement plaster between the spaces made by the screeds on the surface of the wall. This is done through a trowel.
- Level the surface through flat wooden floats and wooden straight edges.
4. Applying Finishing Coat
- The thickness of the finishing coat or the second coat may vary between 2 mm to 3 mm.
- The ratio of cement & sand for the second coat of plaster varies from 1:4 to 1:6.
- Before applying the second coat, dampen or moisten the first coat evenly.
- Apply the finishing coat utilizing the wooden floats to a true even surface & using a steel trowel, to give it a finishing touch.
- As far as possible, the finishing coat should be applied to start from the top towards the bottom and completed in one operation to eliminate joining marks.
5. Curing of Plastering works
- After completion of the plastering work, it is kept wet by sprinkling water for at least 7 days to develop strength and hardness.
- Use of gunny bags or other materials is utilized to keep the plastering works moist in external works.
- Improper curing may lead to the formation of cracks or efflorescence in plastering work.
6. Care to be taken after Completion of Plaster Work
- Cleaning of doors or frames and floor area is necessary after work.
- Curing of plaster should be started as soon as the plaster has hardened sufficiently & must be cured for at least 7 days.
- Curing shall start 24 hours after the plaster is laid.
Mix Proportion Required for Plastering Work
Generally saying, a 1:4 mix ratio is used before plastering, with more water mixed, on the surface of the wall or roof to be plastered (a layer is formed). Then a 1:6 is generally formed as a layer with very less water (like wet sand).
Then, you can work with a straight edge for desired thickness. The cement and fine aggregate mix ratio should be 1:6 (1 Cement: 6 fine aggregate) for internal plastering of bricks and 1:4 for external plastering.
Never do plastering beyond 12 mm or 15 mm thickness on a brick wall. Restrict plastering beyond 6 mm thickness on concrete in one go.
If you have observed cracks in 1:4 or 1:6 mortar mix plaster then the possible reason for cracks can be –
- The cement and sand were not properly mixed during dry mixing.
- The sand used is too fine and hence requires more quantity of cement. So, the 1:5 mix is not having the proper cement content required to coat the sand particles, and hence it can lead to cracking.
- The cement used in plastering is of bad quality or is pre-hydrated due to the presence of moisture.
- Some deleterious material like free lime or Sulphur is present in the sand.
- If the mortar is used for plastering after a long time beyond the initial setting time, then also it can lead to cracks in the plaster.
Requirements for Good Plastering Work
The plasterwork should fulfill the following requirements:
- It should be hard and durable.
- It should remain on the surface and protect from chemical attacks and weathering actions.
- It should have good workability.
- It should have high strength and durability.
- It should be cheap and should be easily available.
- It should protect from the penetration of nature.
Common Plastering Defects and their Remedial Measures
By understanding what types of problems can occur and their causes, you can resolve them before they become bigger issues. These are several common plaster defects and their primary causes & prevention:
Plaster De-bonding
De-bonding may occur when plaster is separated from the wall surface. It can be caused by a thick plaster layer, inadequate substrate preparation, or may be due to a dusty, oily, or dry substrate.
How to prevent it:
- To prevent the de-bonding of plaster, we need to take care of the following things during plastering.
- Clear dust & oil from the plaster substrate before plastering.
- Allow the substrate to reach the correct moisture content.
- If required, you can use bonding chemicals
Efflorescence on Plastered Surface
When a newly constructed wall dries out, the soluble salts are brought to the surface & they appear in the form of a whitish crystalline substance. It is called efflorescence. Efflorescence is found on plasters when soluble salts are present in plaster-making materials as well as building materials such as bricks, sand, cement, etc.
Even water used in construction work may contain soluble salts. It seriously affects the adhesion of paint to the wall surface and causes further problems.
How to prevent it:
- All Construction materials used for the wall should be free from salt.
- Make sure that the surface is moisture-free.
Cracks on Plastered Surface
The most common problem you would have observed in plastering is the crack. Cracks on the plastered surface can be in different forms:
Crazing
It is a network of fine cracks like a spider web. They are commonly very fine & do not extend through the whole depth of the plaster. It happens due to the presence of fine content in the sand or due to a dry base on which plaster is applied – when the base absorbs the water and fines accumulate on the surface, it leads to crazing.
Separation crack at joints
It usually occurs at joints of two different materials for example at the junction of RCC & Brickwork. It occurs due to differential thermal movement.
Hollowness cracks
This crack happens due to hollowness in plastering work. Other reasons could be extra water in the plaster mix or poor workmanship.
How to prevent it:
- Most cracks occur due to wrong workmanship or expansion & shrinkage in the plaster during drying. Below are a few tips to prevent cracks
- Ensure the addition of water in mortar done is by a skilled mason and not by unskilled labor to ensure the desired workability in terms of handling and application.
- It can be avoided by proper curing of the plaster to slow down any rapid drying.
- Taking care of workmanship & material quality issues will help in preventing cracks.
Blistering of Plastered Surface
It is the formation of small patches of plaster, swelling out beyond the plastered, caused due to late slaking (addition of water to lime) of lime particles in the plaster mix. This defect is commonly caused due to the uneven mixing of plaster materials.
How to prevent it:
- This can be prevented by making sure that the appropriate mixing between cement & its components is used to form plaster.
Falling Out of Plaster
This defect can happen in two forms – Flaking of plaster and peeling off a plaster.
Flaking: The shaping of a small loose mass on the plastered surface is known as flaking. It is commonly due to bond failure between successive coats of cement plaster.
Peeling: The plaster from some portion of the surface comes off and a patch is formed. This is termed peeling. It is also mostly due to bond failure between successive coats of plaster.
How to prevent it:
- Both problems can be prevented with proper material selection & surface preparation. Improper adhesion can be minimized by good workmanship.
Popping of Plaster
Popping is the formation of conical-like holes that break out of the plaster. It is caused because of the presence of contaminant particles such as burnt lime or other organic materials in the mix of mortar.
How to prevent it:
- To prevent this defect in plastering, you require to ensure that no contaminant particles are present in the mortar mix.
Loose Plaster
When the plaster gets displaced by external impacts like the application of material or tapping, etc., it is called loose plaster. This defect is caused commonly due to improper mixture & inadequate curing.
How to prevent it:
- It can be prevented with the use of a proper mixture and adequate curing. Proper workmanship will help in avoiding this problem.
Conclusion
Plastering not only makes the surfaces smooth but gives a good finish to the walls, ceiling, and other parts of the building. It is an important part of the construction. To ensure the good quality of plaster, it is most important to know about the defects in plastering.
Our objective for this content was to create awareness about various purposes and defects in plastering and its prevention.